






How to Compare Display Cold Room Insulation Thickness for Energy Control
Start with the temperature duty, not the panel catalog
When a technical team compares insulation thickness for a Display Cold Room, the common mistake is to begin with 50 mm, 75 mm, 100 mm, and treat the choice as a simple price ladder. That usually leads to either overspending on panels or paying for it later in compressor runtime. The first check is the actual operating duty: room setpoint, pull-down frequency, door opening pattern, lighting load, product turnover, and the ambient condition outside the room. Insulation thickness only makes sense when those variables are on the table.
For display use, temperature stability matters twice: once for product protection, and again for customer-facing appearance. If the room is opened often, located near storefront glass, or exposed to strong summer heat, the “good enough” panel thickness from a back-of-house cold room may be too thin here. On the other hand, a lightly loaded display room in a controlled indoor environment may not justify the thickest option available.
The shortlist that actually changes the decision
Before comparing quotations, run through this checklist and fill in real project values:
- Target internal temperature range
- Typical and peak ambient temperature around the installation site
- Whether the room is indoor, semi-outdoor, or directly exposed to solar gain
- Daily door opening frequency and duration
- Heat from lighting, anti-fog devices, fans, and nearby equipment
- Required holding time and tolerance for temperature swing
- Available condensing capacity and control strategy of the refrigeration system
If one of those inputs is missing, the insulation comparison is incomplete. Thickness is not a standalone performance number.
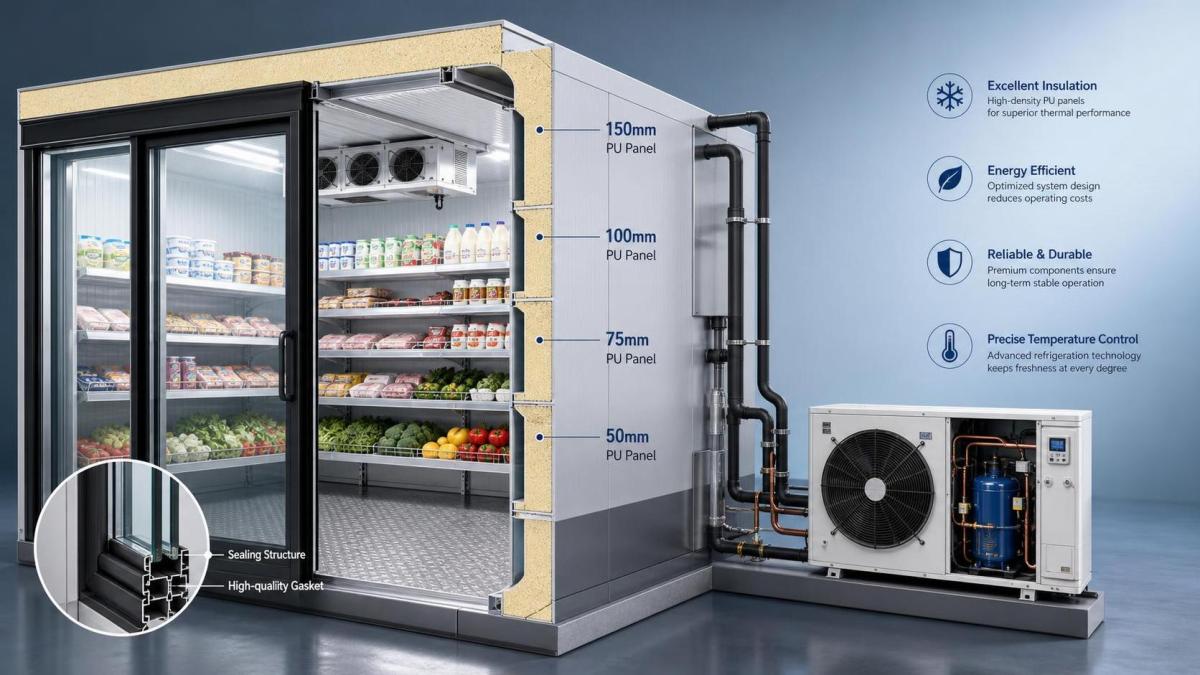
How to read common thickness options in practice
In commercial cold storage, thicker panels reduce heat gain, but the energy benefit is not linear across every project. A practical comparison usually looks like this:
That table is not a substitute for load calculation, but it is useful for screening. If the room is expected to maintain a low setpoint in a high-traffic retail setting, the thinner option usually falls out quickly once infiltration and defrost recovery are accounted for.
Check the full panel build, not thickness alone
Two display cold rooms can both be quoted as “100 mm PU panels” and still perform differently. The technical review should look at core density, panel joint design, vapor sealing, cam-lock accuracy, door frame thermal treatment, and installation quality. A thicker panel with weak joints can leak enough heat and moisture to erase much of its theoretical benefit.
This is where experienced buyers slow down and ask for the exact panel construction and connection details. If the supplier offers polyurethane sandwich panels and prefabricated modular cold rooms, the advantage is not just factory production speed. It is the chance to keep panel consistency, joint repeatability, and dimensional control tighter across the full enclosure.
Pay attention to the door and viewing side
In a Display Cold Room, the wall panel is only part of the energy story. Glass areas, door openings, frame condensation, and traffic patterns often drive more trouble than the nominal wall thickness difference. If the room includes frequent customer access or staff restocking through the same opening, compare insulation options together with door type, sealing method, heater arrangement, and opening time control.
A common field error is upgrading panel thickness while leaving the doorway as the weak point. That usually shows up as sweating around frames, frost near the threshold, and unstable return-air temperature. In evaluation terms, that means the panel upgrade alone will not deliver the expected energy result.
Compare insulation with refrigeration-side capacity, not in isolation
Better insulation lowers the heat load, but the room still depends on how efficiently the condensing side rejects heat. If you are comparing thickness options for a compact commercial system, it is worth reviewing whether the condenser selection is aligned with the expected load profile. For example, H-Type Condenser 404 uses 7 mm copper tubes and hydrophilic aluminum foil, with a design focused on higher heat exchange area per unit volume and reduced refrigerant charge. That kind of condenser detail matters when you are trying to control runtime and system efficiency rather than just hit a nominal cooling point.
This does not mean a better condenser compensates for poor insulation. It means the energy decision should be made as a system comparison: envelope load, evaporator duty, condensing performance, fan power, and control logic all interact.
Look for the break-even point, not the thickest panel
Technical evaluators usually need to answer one practical question: at what thickness does the extra panel cost stop making sense for this project? The clean way to do that is to compare at least three items side by side:
- Initial cost difference between panel options, including doors and installation details if they change with thickness.
- Estimated energy difference under real operating hours and ambient conditions.
- Operational penalty of underinsulation, such as longer pull-down, more frequent cycling, and poorer temperature recovery after openings.
If the room runs long hours in a hot region, the thicker option often pays back faster. In a mild indoor environment with limited temperature lift, the step from medium to heavy insulation may have a much longer payback window. That is why a decision made purely on panel price or purely on energy theory usually misses the mark.
What experienced reviewers flag immediately
- The quotation lists thickness but not core material or joint structure.
- Ambient condition is shown as a generic value, with no site-specific peak scenario.
- Door usage is treated as negligible in a display application.
- Energy comparison ignores fan power, lighting load, or anti-condensation heating.
- The refrigeration unit is selected too close to the load line, leaving no margin for hot days or traffic spikes.
Any one of those can distort the insulation decision. More than one usually means the evaluation needs to be rebuilt from the load assumptions upward.
A practical order for final selection
Use this sequence when narrowing down a Display Cold Room specification: define the actual operating temperature and ambient envelope, screen thickness options by application severity, verify panel construction and joint quality, then check the door and viewing side losses before reviewing the refrigeration match. Only after that should you compare capital cost against expected energy savings.
If the project team wants one rule of thumb, make it this: choose insulation thickness according to the real heat burden and operating pattern of the room, then confirm the rest of the system can preserve that advantage. That is how you avoid buying a cold room that looks efficient on paper but costs more to run in service.
CHAIDONG
Professional generator set manufacturer
24/7 before-sales and after-sales services
Comprehensive technical support