






How to Solve Frost Build-Up and Poor Airflow Problems in an Air-Cooler
Start with the Frost Pattern, Not the Alarm
When an Air-Cooler starts icing up and the room temperature drifts, most operators jump straight to defrost settings. Sometimes that works. Often it just hides the real problem for a few days. Frost build-up and weak airflow usually travel together: ice blocks the air path, fan performance drops, coil heat transfer falls off, and energy use climbs while product temperature becomes harder to hold.
A better approach is to check the unit in the same order the problem develops. Look at the frost pattern, air path, fan operation, defrost performance, and then operating conditions around the evaporator. That sequence saves time and keeps you from replacing good parts.
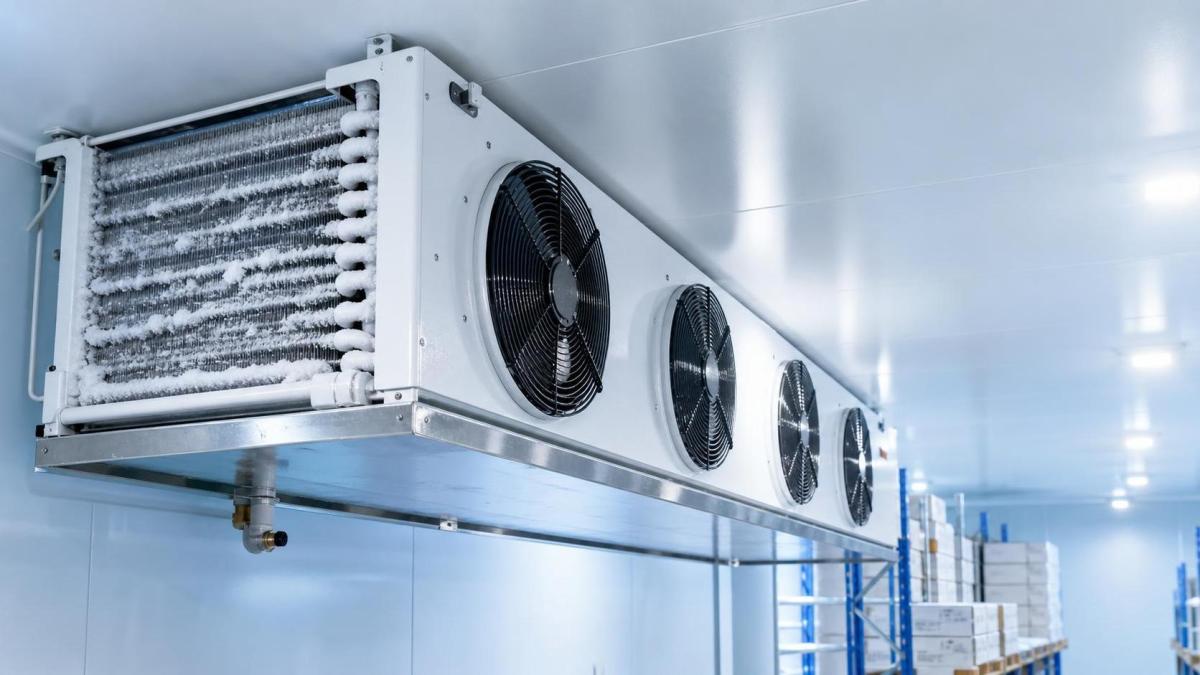
What to check first at the coil face
Before touching controls, open the unit and look carefully at where the frost sits.
- Even frost across most of the coil: this usually points to a defrost issue or heavy moisture load, not a refrigerant distribution problem.
- Ice concentrated on the entering air side: airflow is often too low, or the coil surface is staying below freezing too long between defrost cycles.
- Only part of the coil frosted: that can mean a feed or circuit issue, depending on the system design. Do not assume fan trouble if the frost pattern is patchy.
- Solid ice around the drain pan and coil bottom: melted water is not leaving the unit fast enough, then refreezes during the next cooling run.
This quick visual check matters because “poor airflow” is sometimes the result of ice, and sometimes the reason the ice formed in the first place.
Rule out the simple airflow restrictions
A surprising number of airflow complaints come from basic obstructions around the unit rather than inside it.
- Check the clearance around the air inlet and discharge. Stacked cartons, plastic curtains, temporary shelving, and even badly placed light fittings can disturb throw and return air.
- Look for dirty fins. Grease, paper dust, flour, and packaging lint reduce air volume long before the coil looks badly blocked from a distance.
- Inspect fan guards and blades. A small layer of dirt on the blades can reduce air delivery more than many operators expect.
- If one side of the room feels warm, check whether discharge air is short-circuiting straight back into the return instead of reaching the load area.
One practical clue: if you hear the fans running but the air throw feels weak a few meters away, the problem is often static resistance, blocked fins, or blade contamination rather than total fan failure.
Check fan operation under real load
Do not stop at “the motors are turning.” That is not the same as moving design airflow.
Watch for slow start, uneven fan speed, abnormal noise, vibration, and one fan rotating opposite to the others after service work. On multi-fan evaporators, one underperforming motor can create a dead zone on the coil, and that local cold spot becomes an icing point.
For larger commercial units, fan configuration and fin spacing make a real difference when the room has high moisture load. For example, a model such as Commercial Ceiling-Mounted Evaporator 404D is built with four external rotor axial flow fans and fin spacing options of 5 mm, 7 mm, and 9 mm. In practice, closer fin spacing may improve heat exchange in the right application, but it also becomes less forgiving if cleaning and defrost discipline are poor. That is why the operating condition matters as much as the nameplate.
Do not treat every icing problem as a defrost timer problem
Defrost should be checked carefully, but the goal is to confirm whether the coil is actually clearing fully and draining properly, not just whether a timer is switching.
If the unit uses electric defrost, pay extra attention to heater coverage and water tray heating. Uneven pan heating is a classic reason for repeat ice at the bottom section, even when the upper coil looks acceptable.
Look at room moisture load before changing refrigeration settings
High frost growth is sometimes a room condition problem wearing a maintenance disguise. Frequent door opening, damaged door seals, warm product loading, and wet floor washdown all dump moisture into the space. The Air-Cooler catches that moisture as frost.
A useful field check is to compare icing severity with operating habits. Does the coil frost heavily after busy receiving periods? Does airflow degrade faster on days with more traffic? If yes, adding more defrost without fixing infiltration usually leads to unstable room temperature and higher power use.
Match the coil design to the job
Not every evaporator behaves well in every room condition. Low-temperature rooms, humid product handling, and frequent access demand more tolerance for frost accumulation than a clean, stable storage room.
When reviewing equipment suitability, check fin spacing, fan air volume, throw distance, and defrost capacity together. A unit with high air volume and proper air throw can hold more usable airflow as frost starts to form. For instance, the 404D configuration lists airflow up to 15880 m³/h, throw up to 34 m, and defrost power options up to 13.44 kW. Those figures are useful only when matched to room temperature, product moisture, coil spacing, and operating schedule. Oversimplifying the selection is where many recurring icing complaints begin.
A short checklist for operators during troubleshooting
- Record where the frost is forming, not just that frost exists.
- Check whether every fan is delivering similar airflow.
- Inspect the entering air side of the coil for dirt loading.
- Confirm the drain pan and line are clear after defrost.
- Review door opening patterns and recent warm product loading.
- If the problem repeats, compare the room condition with the evaporator’s fin spacing and defrost arrangement before altering setpoints again.
The fastest way to solve frost build-up and poor airflow is to separate symptom from cause. Start with the coil pattern, then move outward: air path, fans, defrost, drain, room moisture, and equipment match. That order usually tells you whether you need cleaning, component repair, operating changes, or a more suitable evaporator setup. It also prevents the expensive habit of chasing the controller when the real fault is sitting in plain view on the coil face.
CHAIDONG
Professional generator set manufacturer
24/7 before-sales and after-sales services
Comprehensive technical support